Plugin: WebKit HTML to PDF

Today I want to introduce you to a small, but very useful ServiceNow plugin: WebKit HTML to PDF. The name is not very meaningful, so I want to tell you something about this plugin.

The plugin WebKit HTML to PDF is used to provide users the ability to export homepages and dashboards as PDF documents. This is a very useful tool for your daily work. But keep in mind, that this is only an extract and will not be updated, unlike homepages or dashboards.

Note: When you activate this plugin, OAuth 2.0 will be activated as well if not already installed.

ID: com.snc.whtp
Price: Free
Producer: ServiceNow

Roles required
admin

It’s very simple to activate this plugin. I’ll explain what functions the plugin offers and how it is activated.

Before the plugin is actived, lets view the homepage. The homepage (dashboards as well) do not offer any functions to export the visible information to PDF.

Homepage before plugin activation.

Let’s activate the plugin. Plugins are listed in the System Definitions -> Plugins module. In the content frame, search for ‘WebKit HTML to PDF’. Now you can simply klick on Install to install this plugin.

Plugins module.

Before the plugin will be installed, you’ll receive a prompt to finally activate the plugin. Dependent plugins are also shown. For the WebKit HTML to PDF the dependent plugin OAuth 2.0 is necessary and will be automatically activated.

Activation plugin WebKit HTML to PDF.

After you clicked on activate, the plugin will be installed.
Please be careful, activating a plugin can affect performance to your inctance, so I recommend to activate the plugin outside the business hours in order not to impair other users of the systemt.

Activation state of plugin.

The activation is finished in a short time. You have the ability to view the activation log, plugin list or simply close & reload the form to use the functions of the plugin.

Activation result.

In the Plugin Application Logs, the changes are listed which are made to install the plugin.

Plugin Activation Log 1.
Plugin Activation Log 2.

After the installation is completed and the whole website has been refreshed, you can go back to your default landing page and you’ll note a new icon in the banner of the content frame of homepages and dashboards. When you click on this icon, a pop up appears.

Homepage after activation.

The popup ‘Export to PDF’ offers the possibility to define certain frame criteria.
You can devine the Orientation of the export, portrait or landscape. Also the paper size and zoom factor can be set.
A very nice feature is, you can decide between directly generate and download the PDF, or send the PDF export by email to specified recipients.

Export to PDF.

When you select the option to generate the PDF right now, after a few seconds when the export has completed, the PDF can be downloaded.

Export complete, download.

The exported and downloaded PDF file, is shown in the image below for the ITIL Homepage. It’s generated as a letter sized file and all information at the time of export are visible.

PDF export of homepage.

The activation of this plugin has no impact to your instance, it only provides you the ability to simply export dashboards and homepages to PDF.

Interview: Full of drive for ServiceNow

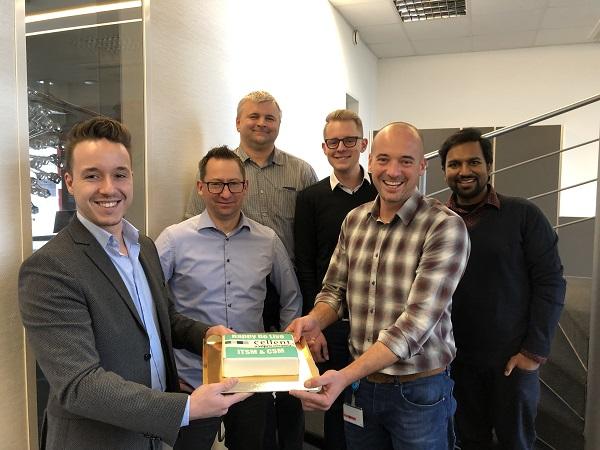
Yesterday I had a great talk with Ricarda Kleff, marketing of cellent a Wipro company about ServiceNow @cellent. Please feel free to read the whole interview below:


English version below


Voller Tatendrang für ServiceNow

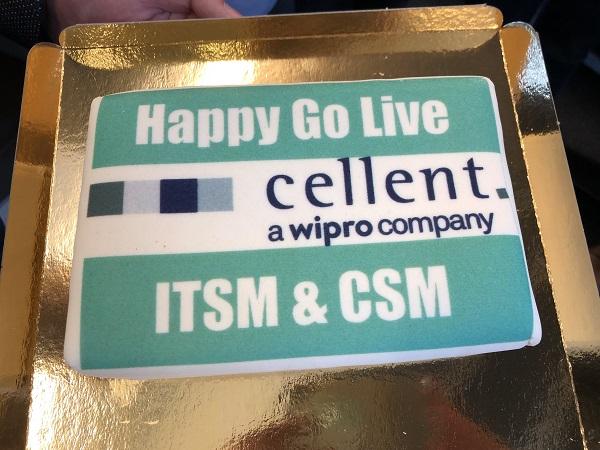
18.12.2019 | Simpel gesagt: Hinter ServiceNow steckt eine Cloud-Plattform, die für effizientes Arbeiten sorgt, dank einem automatisierten Workflow-Management. Auch cellent gehört nun zum Kundenstamm des US-Cloud-Spezialisten und setzt eine ServiceNow Instanz ein. In naher Zukunft will der IT-Dienstleister auch seinen Kunden Beratungs-, Implementierungs- und Entwicklungsservices für die Applikations-Suite aus der Cloud anbieten. Mehr dazu verrät Felix Großer, Junior Consultant und Head of Center of Excellence ServiceNow, hier im Interview.

Felix, die Nachricht ist noch ganz frisch: Du leitest ab sofort das Center of Excellence für Service Now innerhalb der Practice Cloud Infrastructure Services (CIS). Herzlichen Glückwunsch erst einmal. Was genau sind deine Aufgaben?

Vielen Dank! Ich freue mich wirklich riesig diese spannende Aufgabe übernehmen zu dürfen. Deshalb möchte ich mich an dieser Stelle auch bei Matthias Eckmeyer, Leiter Practice CIS, für das entgegengebrachte Vertrauen bedanken. Mein Auftrag ist herausfordernd. Kurz gesagt: Ich werde mich um den Auf- und Ausbau unserer Beratungs-, Implementierungs- und Entwicklungsleistungen rund um ServiceNow kümmern. Das Center of Excellence (CoE) ist eine Art Kompetenzzentrum. Teil des CoE und meiner Arbeit ist es unter anderem ein Qualifizierungsprogramm für unsere Mitarbeiterinnen und Mitarbeiter aufzusetzen, also festzulegen, welche Schulungen für welche Zielgruppe relevant sind. Ein enger Draht zu ServiceNow ist dabei natürlich sehr wichtig. Wir benötigen zum Beispiel Einblicke in die Roadmap, um, was neue Releases und deren Features angeht, am Puls der Zeit zu bleiben. Zusätzlich werde ich mich auch um die Erstellung diverser Unterlagen beispielsweise für Vertriebsaktivitäten kümmern.

Das klingt allemal herausfordernd.

Auf jeden Fall. Aber ich freue mich darauf hier etwas bewegen zu dürfen; sowohl für die Kolleginnen und Kollegen, als auch für die Firma. Denn in ServiceNow steckt echtes Wachstumspotenzial. Die Plattform ist sehr mächtig – und macht sie mit all ihren Anwendungen extrem spannenden und bedarfsgerecht einsetzbar für Unternehmen. ServiceNow geht weit über das klassische IT Service Management (ITSM) hinaus. Sie deckt zum Beispiel zusätzlich Customer Service Management (CSM), IT Operations Management, Personalverwaltung, IT Security, Predictive Analytics und vieles mehr ab.

Welche dieser Teilbereiche nutzen wir als cellent?

Die beiden Hauptanwendungen. Wobei wir aktuell ITSM mit Incident, Problem, Change sowie Service Request Management im Einsatz haben. In naher Zukunft folgt dann auch CSM.

Deine bisherigen Erfahrungen mit ServiceNow teilst du in einem eigenen Blog. Woher kam diese Idee?

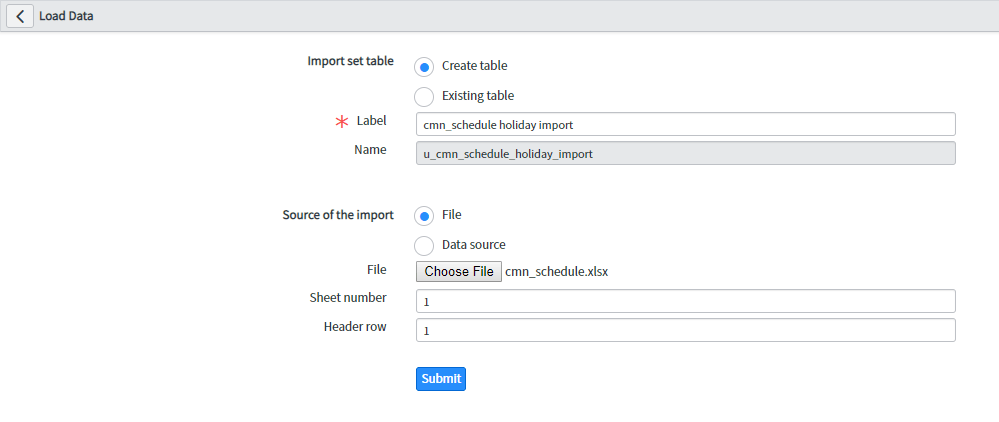
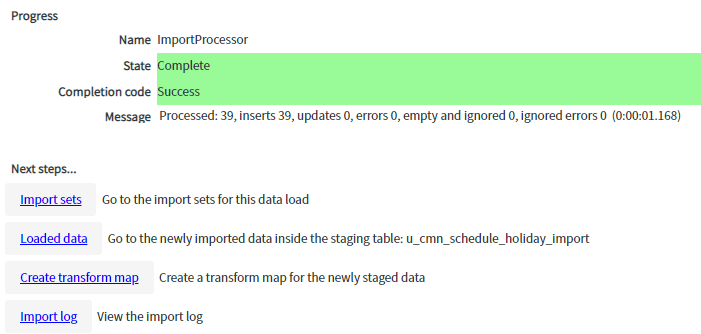
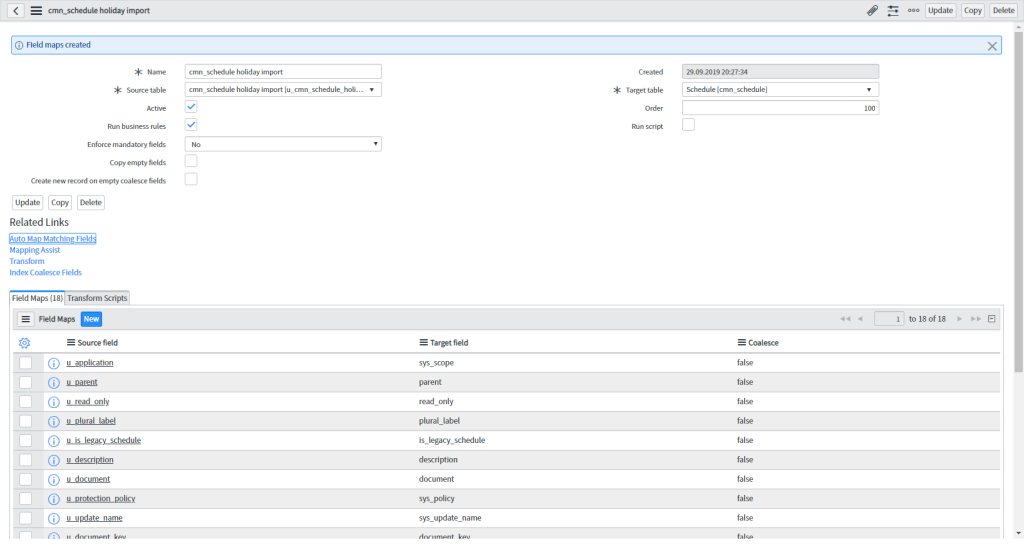
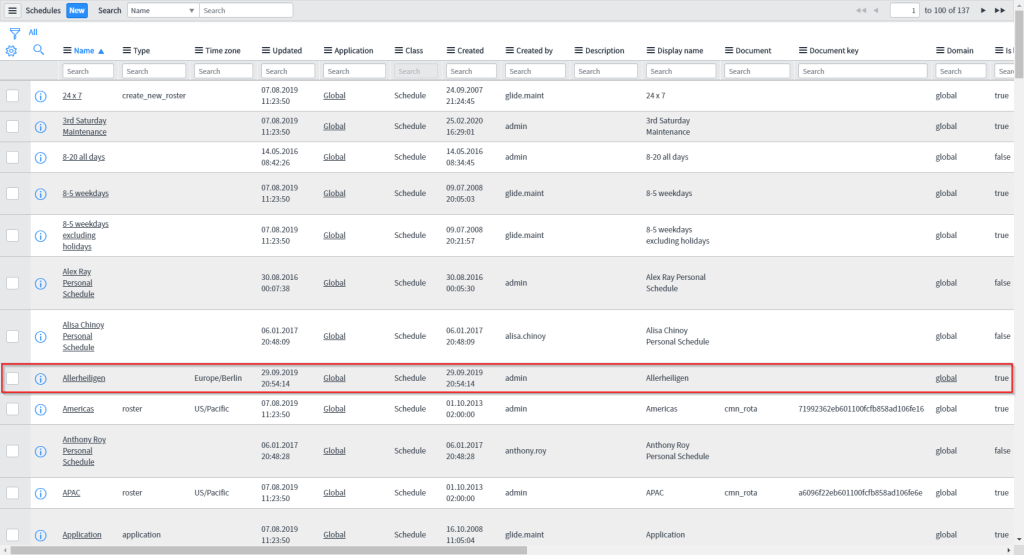
Die Idee kam eigentlich eher spontan auf.  Ich gebe mein Wissen gerne weiter und das ist auch die Zielsetzung meines Blogs „Fix IT – today“. Im Rahmen unserer Einführung von ServiceNow standen wir beispielsweise vor dem Problem die Service Level Agreements unter Berücksichtigung der Feiertage in Deutschland abzubilden. Davon habe ich mich als Blog-Schreiber inspirieren lassen, mit meiner persönlichen ServiceNow Instanz herumgespielt und meine Lösung in Worte gepackt. Anschließend wurde sie sogar auch im Projekt umgesetzt. Mein Job dient somit als Inspirationsquelle für den Blog.

Felix, wir danken dir für das interessante Gespräch und freuen uns schon jetzt auf deine nächsten Blog-Beiträge!


Full of drive for ServiceNow

18.12.2019 | Simply put: ServiceNow is a cloud platform that ensures efficient work thanks to automated workflow management. cellent now also belongs to the customer base of the US cloud specialist and uses a ServiceNow instance. Soon, the IT service provider also wants to offer its customers consulting, implementation and development services for the cloud-based application suite. Felix Großer, Junior Consultant and Head of Center of Excellence ServiceNow, gives more details here.

Felix, the news is still fresh: You are now leading the Center of Excellence for ServiceNow within the Practice Cloud Infrastructure Services (CIS). Congratulations! What exactly are your tasks?

Thanks a lot! I’m more than pleased to take over this exciting task. Therefore, I would like to take the opportunity to thank Matthias Eckmeyer, Head of Practice CIS, for the trust he has placed in me. Honestly, my job is challenging. In short: I will take care of the development and expansion of our consulting, implementation and development services for ServiceNow. The Center of Excellence (CoE) is a kind of competence center. Part of the CoE and my work is, among other things, to set up a qualification program for our employees, for instance, to determine which training courses are relevant for which target group. A close connection to ServiceNow is of course very important as well. For example, we need insights into the roadmap in order to stay up-to-date with regards to new releases and their features. In addition, I will also take care of creating various documents like sales collaterals.

That really sounds challenging indeed.

Absolutely. But I am looking forward to being able to make a difference here and drive the topic forward; both for my colleagues and for the company. ServiceNow has real growth potential. The platform is very powerful – and with all its applications it becomes extremely exciting for companies. They can use it based on their needs. ServiceNow goes far beyond classic IT service management (ITSM). For example, it also covers Customer Service Management (CSM), IT Operations Management, Personnel Management, IT Security, Predictive Analytics and much more.

Which of these parts are we using at cellent?

The two main ones. Currently, we have ITSM with Incident, Problem, Change and Service Request Management in use. And in the near future, CSM will follow.

You are sharing your previous experiences with ServiceNow in your own blog. How did you come up with this idea?

The idea came up rather spontaneously. I like to pass on my knowledge and that is also the goal of my blog “Fix IT – today“. As part of our implementation project, for example, we faced the problem of displaying the service level agreements considering the public holidays in Germany. As a blog writer, I got inspired by this, played around with my personal ServiceNow instance and put my solution into words. And it was even implemented in the project. Thus, my job also serves as a source of inspiration for my blog.

Felix, thank you so much for the interesting conversation and we are already looking forward to reading your next blog posts!

Release Notes: Orlando – first information to Flow Designer and IntegrationHub

Today I had the chance to get some Flow Designer and IntegrationHub information of the next ServiceNow release in Q1 2020: Orlando!
undefined

The Orlando release is according to the motto ‘Smarter, Faster, Easier’.
Some of the release notes are described below on behalf of the Safe Harbor statement:

Flow Designer
Flow Designer is a Now Platform® Feature that gives you rich capabilities for automating processes in a single design environment. Flow Designer lets process owners use natural language to automate approvals, tasks, notifications, and record operations without coding.

The published new functions include:

  • Support IntegrationHub
    • Data Transformations
    • 3rd party introspection of results
  • Dynamic Outputs
  • Dynamic Subflows
  • What changed trigger
  • Support Service Level Management
    • SLA Timer
  • Natural Language
    • Action title authoring

IntegrationHub
IntegrationHub is ServiceNow’s possibility to integrate 3rd party systems. It enables anyone-developers, IT generalists, and process analysts-to extend flows in Flow Designer to any 3rd party service and easily create end-to-end digital workflows.

Some new functions include:

  • Modernize Auth Framework
    • Custom Auth & Request signing
    • Connection Configuration UX v1
  • IntegrationHub Usage dashboards (Features, Password Reset, CSD (Client Software Distribution))
  • Data Stream
    • MID Support
    • Action API Support
    • Usability improvements
  • Codeless integrations
    • Input Sanitization transform for JDBC/SSH
    • Dynamic outputs
  • Orchestration Party
    • Migrate Client Software Distribution
    • Protocols: SFTP, Managed File Transfer

Also, in Q2 ’20 some SAP integrations are announced. Some of them are Ariba, BusinessSuite, Fieldglass, S4/Hana and Concur.

ServiceNow Mobile Applications: quick overview

ServiceNow offers some Apps for mobile phones to make it easier to work everywhere and anytime you want. Currently there are four Apps offered by ServiceNow:
ServiceNow Classic
Now® Mobile
ServiceNow® Agent
ServiceNow® Onboarding

I only want to provide a quick overview of these Apps.

ServiceNow Classic

The ServiceNow Classic mobile app is similar for both Android and iOS with a few minor differences to make the experiences unique to each platform.

Using the ServiceNow Classic mobile app to:

  • Access lists and forms.
  • Save favorite lists and records to the app homescreen.
  • Access the Service Catalog from your mobile device.
  • Communicate with other users within the platform using Connect Chat for mobile.
  • Share your location.

The functions are stripped down a bit, but you are able to watch incidents or tasks assigned to you, create new one and so on. You have access to your favorites as well. So you are able to work on the go like you are at your workplace.

The ServiceNow Classic app is already functional out of the box and can be used directly.

Now® Mobile

Fast help, one place for approvals, global search like info, items or contacts are only a few benefits of the Now® Mobile app.

With Now® Mobile, employees can find answers and get stuff done across IT, HR, facilities, finance, legal, and other departments – all from a modern mobile app powered by the Now Platform®.

  • To-dos and approvals
  • Global search
  • Service catalog
  • Knowledge articles
  • Virtual Agent and live chat
  • Siri Shortcuts

The Now® Mobile is available with IT Service Management or HR Service Delivery and powered by the Now Platform.

ServiceNow® Agent

Mobile consumer apps enable you to connect with friends, hail a ride, or order a takeout with a few tabs or swipes. Now you can get work done on your phone as easily.

  • Incident and case management
  • Team-wide visibility
  • Approvals
  • Task-focused layouts
  • Device hardware integration
  • Offline read and write
  • Dynamic landing pages

Mobile Agent is available with the Now Platform®. Build digital workflow apps and extend your ServiceNow solutions with a leading platform as your foundation.

ServiceNow® Onboarding

Enable new hires to complete tasks, view content, and get help across departments – all from a single native mobile app.

Unlike the other apps, this one is optimized for new hires before their first day and the first days after.

The functions of this app are only available by the Now Platform powered Enterprise Onboarding and Transitions module.

Referred Links
https://docs.servicenow.com/bundle/madrid-mobile/page/administer/tablet-mobile-ui/concept/get-started-end-user.html
https://www.servicenow.com/products/now-mobile.html
https://www.servicenow.com/products/mobile-employee-onboarding.html https://www.servicenow.com/products/mobile-agent.html
https://www.servicenow.com/content/dam/servicenow-assets/public/en-us/doc-type/infographic/now-mobile-infographic.pdf

Time for customizing: ServiceNow CSS Themes for Now Platform UI

It’s time for customizing the ServiceNow instance. In this article I’ll explain you how to create custom CSS themes for your ServiceNow instance.

In our company we wanted to customize our instance with two themes. A light one and a modern looking dark one. The most popular pros of dark themes are, they are battery saving, good to look at and more important, they are better four your eyes 😉 but only if you are working on night-time or dimmer workspaces. When you work in bright environments, a light theme is better for your eyes.

Both themes should be leaned to our corporate identity. So we asked our marketing to get the color codes. Since the color codes are in RGB we had to transform them into hex color codes. You can find a appropriate website below under Related Lists.

Required Roles
admin

UI16
The easiest way to customize the look of your instance is to edit the System Properties -> Basic Configuration UI16 module. In this module you are able to change some popular design options like the following:

Label Description Related System Property
Page header caption Custom Text in the Banner Frame. glide.product.description
Browser tab title Title of the browser tab.
Note: the browser tab title is divided into two sections: the title of the current displayed module and the defined Browser tab title. Both separated by a ‘|’ character.
undefined
Knowledge is the current selected module ant ‘ITSM universe – DEV’ is the Browser tab title.
glide.product.name
System timezone for all users unless overridden in the user’s record Select the time zone in the choice list. This is the default time zone every user has initially selected. The user is able to change this time zone in the user settings. You can click on Configure available time zones to prevent the users from selecting unnecessary time zone. glide.sys.default.tz
Banner image for UI16 Add a custom logo. glide.product.image.light
Date format Time format Select the date and time formats from the choice lists glide.sys.date_format Glide.sys.time_format
Header background color Color for the Banner Frame background.
undefined
css.$navpage-header-bg
Banner text color Color for the Banner Frame text.undefinedcss.$navpage-header-color
Header divider stripe color Color for the divider between the Banner Frame and the Application Navigator.undefined css.$navpage-header-divider-color
Navigation header/footer Color for the header/footer of the Application Navigator section.undefinedcss.$navpage-nav-bg
Navigation background expanded items Background color for the expanded modules in the Application Navigator.undefined css.$subnav-background-color
Module text color for UI16 Color for the module text.undefined css.$navpage-nav-color-sub
Navigation selected tab background color Color for the active tab in the Application Navigator.undefined css.$navpage-nav-selected-bg        
Navigation selected tab divider bar color         Color of the divider of the active tab and the Application List in the Application Navigator.
undefined
Note: This color is also used as part of the theme preview on the Themes tab under system settings.
css.$nav-highlight-bar-active        
Navigation unselected tab divider bar color         Color of the divider of the inactive tab and the Application List in the Application Navigator.undefined css.$nav-highlight-bar-inactive        
Navigationseparator color Color for the divider of  navigation separator.undefinedcss.$nav-hr-color
Background for navigator and sidebars         Background color of the navigator and sidebars.undefinedcss.$navpage-nav-bg-sub        
Currently selected Navigation tab icon color for UI16         Color of the active Navigation tab icon.undefinedcss.$navpage-nav-selected-color        
Unselected navigation tab icon and favorite icons color         Color of the inactive Navigation tab icon.undefinedcss.$navpage-nav-unselected-color        
Border color for UI16         Select or enter the color. Also affects the border of the Filter conversations search box in the Connect Chat sidebar.undefined css.$navpage-nav-border        
Selected base theme         Switches the main content (everything other than the application navigator and the header) between the La Jolla and Cobalt themes. glide.ui.base_theme.selected_theme        

Do not forget to Save your settings. 😉

Base Theme
Maybe you are asking yourself, what the base theme is as I have done. Therefore I want to provide clarity.

The two base themes are ‘La Jolla’ and ‘cobalt’. La Jolla is the new brand theme for ServiceNow. Since the Upgrade from previous Versions to Madrid, the theme is automatically upgraded to the La Jolla theme. Any customizations you have made to the system will not be upgraded.

CSS class support
With CSS variables you have more power to customize the look of the instance than with the Basic Configuration UI16 module.

CSS class Description How to configure Affected area
$navpage-header-bg Header background color Navigate to System Properties > Basic Configuration UI16 > Header background color
$navpage-header-color Color for header text and the global search icon Navigate to System Properties > Basic Configuration UI16 > Banner text color
$navpage-header-button-color Color for logged in user name text, and the global searchConnect, Help, and settings icons Add the CSS property to the CSS field of a theme. For more information, see Create or customize a theme.
$navpage-header-divider-color Header divider color Navigate to System Properties > Basic Configuration UI16 > Header divider stripe color
$navpage-button-color Color for the following icons in the sidebars Expand/collapse Create a conversation (in the Connect sidebar) Open Connect workspace Add the CSS property to the CSS field of a theme. For more information, see Create or customize a theme.
$navpage-button-color-hover Color for the following icons when a user points to the control: Global search Help Settings Clear text icon in the navigation filter Add the CSS property to the CSS field of a theme. For more information, see Create or customize a theme.
$search-text-color Color of the search text, both in the navigation filter and the global search fields Add the CSS property to the CSS field of a theme. For more information, see Create or customize a theme.
$navpage-nav-border Border color for the navigation filter and the conversation filter Navigate to System Properties > Basic Configuration UI16 > Border color for UI16
$nav-highlight-main Highlights the module after the user has clicked it. In the Connect workspace, highlights the selected conversation. Add the CSS property to the CSS field of a theme. For more information, see Create or customize a theme.
$subnav-background-color Background for expanded navigation items Navigate to System Properties > Basic Configuration UI16 > Navigation background expanded items
$navpage-nav-bg Header and footer for navigator and sidebars. Navigate to System Properties > Basic Configuration UI16 > Navigation header/footer
$navpage-nav-bg-sub Background for navigator and sidebars Navigate to System Properties > Basic Configuration UI16 > Background for navigators and sidebars
$navpage-nav-color-sub Text color for modules in the main navigation Add the CSS property to the CSS field of a theme. For more information, see Create or customize a theme.
$navpage-nav-mod-text-hover Text color when hovering over items in the main navigation Not supported Not supported
$nav-hr-color Navigator separator color Navigate to System Properties > Basic Configuration UI16 > Navigation separator color
$nav-highlight-bar-active Line under the active tab in the application navigator. This color is also used as part of the theme preview on the Themes tab under system settings. Navigate to System Properties > Basic Configuration UI16 > Navigation selected tab divider bar color
$nav-highlight-bar-inactive Line under the inactive tabs in the application navigator Navigate to System Properties > Basic Configuration UI16 > Navigation unselected tab divider bar color
$navpage-nav-selected-bg Navigation selected tab background color Navigate to System Properties > Basic Configuration UI16 > Navigation selected tab background color
$navpage-nav-selected-color Currently selected Navigation tab icon color Navigate to System Properties > Basic Configuration UI16 > Currently selected Navigation tab color for UI16
$navpage-nav-unselected-color Unselected navigation tab icon and favorite icons color Navigate to System Properties > Basic Configuration UI16 > Unselected navigation tab icon and favorite icons color
$connect-latest-message Color of the currently selected message in Connect Add the CSS property to the CSS field of a theme. For more information, see Create or customize a theme.
$nav-timeago-header-color Timestamp header backgrounds in History tab Not supported Not supported
$navpage-nav-app-text Core content text color for items such as applications and the empty state text for the Connect sidebar. Add the CSS property to the CSS field of a theme. For more information, see Create or customize a theme.
$navpage-nav-app-text-hover Text color for a selected module Add the CSS property to the CSS field of a theme. For more information, see Create or customize a theme.

Add Theme
I’ll provide you two examples of themes, a dark and a light one. Maybe you’ll need to play with your color variables to get the best suited design for your instance. In some cases you could set one color to two variables and the worst could be to no longer see your text. The best is to test your custom CSS themes in your companies dev instance or your personal dev instance. 😉

To upload your custom theme, go to System UI -> Themes and click New.

You have to provide the following information:
Name: provide a name for your theme like COMPANYNAMELight or COMPANYNAMEDark.
Base Theme: Selest a base theme. As you learnd, select the La Jolla theme.
Application: keep Global.
Active: select if you are ready to offer the theme for your coworkers.
CSS: provide the CSS variables and settings in the following format:
$navpage-header-bg: #3c3c3c
Device: select one of the following from the Device choice list to identify the user interface version for the theme:

Option Description
Browser Identifies a Legacy: UI11 theme.
Doctype Identifies a UI15 theme.
Concource Identifies a UI16 theme.

To apply the theme, go to Settings in the Banner Frame, Theme and then choose your preferred theme.

Note: When you are already creating themes for the prod instance, keep thinking on create one single theme with other colors for your dev or each other instance in order to be able to distinguish them visually quickly.

Download

Referred Links
https://docs.servicenow.com/bundle/newyork-platform-user-interface/page/administer/navigation-and-ui/reference/customizing-instance-appearance.html
https://www.color-hex.com/
https://docs.servicenow.com/bundle/newyork-platform-user-interface/page/administer/navigation-and-ui/task/t_ConfigureLogoColorsSysDfltsUI16.html

Clone prod environment to dev (or other)

Ever wondered how you can clone your productive environment to your development environment to work, test and develop with real data?

That’s what we want in our company. For now we made all changes in the productive environment, as the initial configuration. But after the go live, we wanted to test the changes and planned improvements for the ServiceNow experience before we implement those in our productive instance.

Note: The cloning process in ServiceNow is handled as a change request in the HI portal.

Clone process

In the following image you’ll find the clone process.

Clone process overview

The following tasks will be performed of the ServiceNow platform:

  1. Generates a file to preserve operational data on the target server. This file contains the data preserved by data preservers.
  2. Copies the database schema from the source instance to the target instance.
  3. Create tables in the target instance database using the source instance table definitions.
  4. Copies data from the most recent nightly backup of the source instance to the target instance database.
    Certainly large tables are normally excluded. These include audit, log, and email tables.
  5. Briefly disables UI traffic and requests to the target instance server.
  6. Displays the message Clone in progress… to any user accessing the target instance.
  7. Restores operational data preserved from the target instance.
  8. Runs any post-clone cleanup scripts on the target instance.
  9. Briefly suspends all email functions on the target instance.
  10. Queues any event to regenerate text indexes.
  11. Enables UI traffic and requests to the target instance server.

What you’ll need:

Roles: Clone_admin
URL of target instance
Admin username and password of target instance

Note: The target cannot be a live production instance

Note: Ensure the target instance, whether dev, test, stage or other, has the system property glide.db.clone.allow_clone_target enabled.

After you provided all information, we will prepare the cloning process.

Source instance:

Co create a target, go to the module Administration -> Clone Targets and hit new.

PJ0•essed * 
加 0 ) e " eu ! 山 e 
山 e 山 1 * 
u 丨 ~ 1 d 川 uno a 川 艹 0 | ) 01 
Ⅵ nb , , 一 吅 •p 亅 p 」 0 」 Mau

Select the target instance

Now we created a target entry, we will request the clone process. Therefore navigate to System Clone -> Request Clone.

You are asked to provide the target instance. Therefore select the previous created instance.

In the next field, you can define a schedules start time for the clone process.

Now a form is displayed where you have to set the necessary information:

Field Description
Target instance Select the previous created instance as target.
Clone Schedules Start time Note: I’d like to recommend to clone the instance outside the business hours due to performance issues of the productive, source instance.
Email upon completion Email recipient when the clone is done or failed

Clone options

Field Description
Exclude tables specified in Exclusion List Prevent cloning records from the source instance specified in the System Clone > Exclude Tables module. Use this option to create empty but usable tables on the target instance. By default, the system excludes tables for auditing, license usage, logging, and notifications. This option is selected by default. Note: This option is not supported by the legacy clone engine.
Exclude audit and log data Prevents cloning audit and log records from the source instance. Use this option to create empty but usable audit and log tables on the target instance. This option is selected by default.
Exclude large attachment data Prevents the cloning of large attachments such as video files, image files, and other typically large binary file types. Excludes all common binary file types, regardless of file size. When selected, the clone also excludes attachments from the Attachments [sys_attachment] and Attachment Documents [sys_attachment_doc] tables that meet all these criteria.
The attachment table_name value does not indicate it is a small file. Small attachments have table name values that start with ZZ_.
The attachment data type value indicates it is a large file such as application or video.
The attachment table_name is not one of these system tables: sys_certificate, ecc_agent_jar, ecc_agent_mib, sys_store_app, or invisible.sys_store_app.
Amount of data copied from large tables Select the number of days of historical data to clone from large source tables, including task, pa_scores, and metric_instance. By default, the target instance receives the latest 90 days of historical data from the source instance.
Preserve theme Preserves the theme and CSS elements on the target clone.
Preserve users and related tables Prevents Users and user-related tables from being overwritten on the target clone.
Clone frequency* Specify how often this target automatically receives clone data. For more information about scheduling cloning, see Schedule cloning.
No. of occurrences* Specify the number of automatic clonings. The maximum value is 9.

*This is not necessary in our use-case.

System Clone 
Subrnit 
Cloning copies configuration and application data from the source instance to the target instance (More info). Backup 
any unpublished custom applications and update sets tkfore requesting a clone (More info) 
Cbræ 
Chne 
* Target 
* Clone Scheduled Start Time 
Email upon completion 
Options 
Exclude tables 
Exclude 
Q 
Amount of data tables 
Last 90 days 
and tables 
O

After you provided all information and hit the submit button, you are asked to authenticate with the credentials of the target instance admin.

Machine generated alternative text:
Authenticate Target - 
To clone to an instance, ycnl must have admin privileges on the target instance 
Instance URL: https:/,a........dev.service-now.com 
Username: admin 
Password: 
Authenticate
Machine generated alternative text:
Confirm 
Warning! 
Any update sets, development work, and data in the target instance will be 
overwritten. 
Do you want to proceed? 
Cancel

When everything is prepared, you’ll receive change request notifications for your clone request. Those notifications are sent from the HI portal.

I’d like to show you this notifications, but there are sensitive data contained, so you’ll need to view those on your own. 😉

Cancel a clone

Required role:
Admin

In some cases you have to cancel a clone process for a reason. To cancel the clone, you simply go to the module System Clone -> Live Clones -> Active Clones. You’ll find a list with the active clones. Now open the wanted clone. The option to cancel a clone, you find on the Related Links section. Be careful, the clone process is directly canceled. You won’t receive any confirmation page.

Cbne 
= System Clone I clone_request view•l 
Clonng copies configuration and application data from the source instance to the target instance (Yore info). Backup 
any unpu%hed custom applications and update sets before requesting a clone (More info) 
* Target in 
* Clone Scheduled Start Tirne 
Email upon completion 
Options 
Related Links 
Cancel Clone

Duration and completion

The duration of the progress depends on your amount of data and which tables you defined for the cloning.

For comparison, we have productive data from two months and not excluded any table. In our case, the cloning took about 00:45h for completion. You can see the history as well as the Clone Logs in the System Clone -> Live Clones -> Clone History module.

Rollback

After clone completion, you have up to contact ServiceNow Customer Support and request a rollback of the target instance to its pre-clone state. You are notified when the rollback is complete.

Referred Links

https://docs.servicenow.com/bundle/newyork-platform-administration/page/administer/managing-data/concept/c_SystemClone.html

Save the date… Now at Work – Frankfurt am Main: 30. Oktober 2019

Now at Work – Frankfurt 2019 – Ich bin dabei!

Es ist eine meiner ersten Konferenzen und die erste von ServiceNow überhaupt. Ich bin unglaublich froh, dabei zu sein!

Die Konferenz findet am 30. Okober 2019 im Congress Center Messe Frankfurt statt.

Über Now at Work – Für eine Welt, in der Arbeit weniger Arbeit macht

Now at Work bringt außergewöhnliche Menschen zusammen, die die Arbeitswelt verändern. Besuchen Sie uns in Frankfurt und erleben Sie, wie digitale Workflows die Arbeit für jeden sinnvoller und produktiver machen. Für eine Welt, in der Arbeit weniger Arbeit macht.

Lassen Sie sich inspirieren

Experten aus renommierten deutschen Unternehmen teilen mit Ihnen aus erster Hand, wie vormals fragmentierte Prozesse in ihren Unternehmen durch intelligente, digitale Workflows transformiert wurden.

Informieren Sie sich

Es erwarten Sie spannende Vorträge und praxisnahe Trainings mit technischen Experten und Entscheidungsträgern, die Sie dabei unterstützen, leistungsstarke digitale Workflows auch in Ihrem Unternehmen zu entwerfen und zu implementieren.

Vernetzen Sie sich

Tauschen Sie sich aus mit ServiceNow-Kunden, -Partnern und -Experten aus Deutschland, die Sie bei Ihrer digitalen Transformation inspirieren und unterstützen können.

Werden Sie aktiv

Erstellen Sie neue Enterprise Workflow Apps, oder erleben Sie einen Deep Dive zu den neuen Funktionen der Now Platform.

Hier findet Ihr das Programm & Agenda.

Schedules Public Holiday Germany for SLA Definitions

In the company I’m employed at we’re currently planning our service level agreements based on the different contracts, wondering how we can do justice to the situation of various public holidays of the German states.

Now I’m sitting here and wondering, how to easily create a single data source in excel for the public holidays in Germany and import them all at once.  There should be a solution to make a bulk import but I’m not able to find something on the world wide web.

So now I’m on my own. To my luck there are some default schedules for the U.S. Holidays on which I can orient myself.

The entries shown there are very well. But what’s with the dynamic holidays like Easter Sunday? – One solution came around in mind: Create an own schedule with all dynamic days for this and then create an parent-child relationship. For this it should be possible to create an excel file and then import everything all at once.

Export source data

First of all, I viewed the schedules table (cmn_schedule) where all schedules are stored. To export this table, you only need to click on one column option , select Export and then Excel (.xlsx).

To export the second table, I had to find the name. For this, I opened an schedule entries entry and right clicked on Show – ‘name’. After this, a small window appeard and I was able to see the table name (cmn_schedule_span):

I searched for this table by typing in cmn_schedule_span.list in the navigation field and hit enter. I exported this table like the one before.

Now I have the data of both, the schedules and the schedule entries.

From now it would be easy – I thought.

After I viewed the Content frame, I saw a related list which handles the parent/child relationships. This is a requirement as well. To find this table, I had to search a lot. But I’ve done it.

You need to klick in the table, e.g. Child Schedules on the Column Options , Configure and then select table. A new form is shown and you can see the table name cmn_other_schedule. Now I searched again in the navigation field to view the entries and export them.

Now I have all three source tables where I can orient myself:

Cmn_schedule.xlsx
– all schedules are stored here

Cmn_schedule_span.xlsx
– all schedule entries are stored, like the holiday “Neujahr” and it’s value, even if and when it’s repeated.

Cmn_other_schedule.xlsx
– all parent child relationships are stored here

Plan the data

I have opted for a detailed and yet simple method. For each object I make an own schedule where either the entry is stored or at least the reference to the child schedule.

So I had to gather all the information. You can see them in the following list:

  • Allerheiligen
  • Augsburger Friedensfest
  • Baden-Württemberg
  • Bayern
  • Berlin
  • Brandenburg
  • Bremen
  • Buß- und Bettag
  • Christi Himmelfahrt
  • Deutsche einheitliche Feiertage
  • erster Weihnachtstag
  • Fronleichnam
  • Hamburg
  • Heiligabend
  • Heilige drei Könige
  • Hessen
  • internationaler Frauentag
  • Karfreitag
  • Mariä Himmelfahrt
  • Mecklenburg Vorpommern
  • Neujahr
  • Niedersachsen
  • Nordrhein-Westfalen
  • Ostermontag
  • Ostersonntag
  • Pfingstmontag
  • Pfingstsonntag
  • Reformationstag
  • Rheinland-Pfalz
  • Saarland
  • Sachsen
  • Sachsen-Anhalt
  • Schleswig-Holstein
  • Silvester
  • Tag der Arbeit
  • Tag der deutschen Einheit
  • Thüringen
  • Weltkindertag
  • zweiter Weihnachtstag

In the second step I need the relationship of the individual schedules.

Parent Schedule Child schedule
Baden-Württemberg Heilige drei Könige
Baden-Württemberg Fronleichnam
Baden-Württemberg Allerheiligen
Bayern Mariä Himmelfahrt
Bayern Allerheiligen
Bayern Heilige drei Könige
Bayern Fronleichnam
Berlin internationaler Frauentag
Brandenburg Reformationstag
Bremen Reformationstag
DE consostent Holidays DE consostent dynamic Holidays
Deutsche einheitliche Feiertage Ostermontag
Deutsche einheitliche Feiertage Pfingstmontag
Deutsche einheitliche Feiertage zweiter Weihnachtstag
Deutsche einheitliche Feiertage Tag der Arbeit
Deutsche einheitliche Feiertage Tag der deutschen Einheit
Deutsche einheitliche Feiertage Silvester
Deutsche einheitliche Feiertage Karfreitag
Deutsche einheitliche Feiertage Christi Himmelfahrt
Deutsche einheitliche Feiertage Heiligabend
Deutsche einheitliche Feiertage Ostersonntag
Deutsche einheitliche Feiertage Pfingstsonntag
Deutsche einheitliche Feiertage erster Weihnachtstag
Deutsche einheitliche Feiertage Neujahr
Hamburg Reformationstag
Hessen Fronleichnam
Mecklenburg Vorpommern Reformationstag
Niedersachsen Reformationstag
Nordrhein-Westfalen Fronleichnam
Nordrhein-Westfalen Allerheiligen
Rheinland-Pfalz Fronleichnam
Rheinland-Pfalz Allerheiligen
Saarland Mariä Himmelfahrt
Saarland Fronleichnam
Saarland Allerheiligen
Sachsen Buß- und Bettag
Sachsen Reformationstag
Sachsen-Anhalt Heilige drei Könige
Sachsen-Anhalt Reformationstag
Schleswig-Holstein Reformationstag
Thüringen Reformationstag

To plan the data for the entries, I searched the web to find a list where every holiday in germany and the corresponding states are stored. After a short time I found what I was looking for. On the web page of excelformeln (http://www.excelformeln.de/formeln.html?welcher=3) is a well explained forumla to identify the Ostersonntag. Based on this holiday, it’s easy to calculate each other dynamic holiday. There is also a file stored which already provides every holiday in each state. A nice benefit!

With this file it was very easy for me to plan the holidays and transform them into the file.

The most important fields for the entries are the following in a specific format:

Field name Example
Name Neujahr
All day TRUE
Repeat on 1
Start date time 01.01.2019 00:00:00
End date time 01.01.2019 23:59:59
Class Schedule Entry
Month 1
Monthly type Day of the month
Repeat every 1
Repeat until 0
Repeats Yearly
Schedule Deutsche einheitliche Feiertage
Show as Busy
Type Busy
Yearly type Day of the year

Import the update sets

Warning: it’s necesarry to import the files in the following order. If not, the importing process will  go wrong:

Cmn_schedule

Cmn_schedule_span

Cmn_other_schedule

To import the updates, I first have to load the data. Go to System Import Sets -> Load Data.

I created a new table like displayed in the image and hit submit:

The data was successfully loaded. Now I have to create a transform map. Therefore click on the Next steps Create transform map. After I provided all necessary information, I clicked on Auto Map Matching Fields.

Sometimes you have to use the Mapping Assist to map the source field to the correct target field. After everything has been mapped, you can Transform.

Now you can view the Schedules list and validate the import.

Now repeat this with the other two tables:

Cmn_schedule_span.xlsx
Load Data:
– Import set table: Create table
– Label: cmn_schedule_span holiday import
– Source of the import: File
– File: cmn_schedule_span.xlsx
Create transform map:
– Name: cmn_schedule_span holiday import
– Target table: Schedule Entry [cmn_schedule_span]
Auto Map Matching Fields
Mapping Assist (optional) NOTE: check Name field
Transform

Cmn_other_schedule.xlsx
Load Data:
– Import set table: Create table
– Label: cmn_other_schedule holiday import
– Source of the import: File
– File: cmn_other_schedule.xlsx
Create transform map:
– Name: cmn_other_schedule holiday import
– Target table: Other Schedule [cmn_other_schedule]
Auto Map Matching Fields
Mapping Assist (optional)
Transform

Please validate the new Schedules. Now you and we are able to create SLAs to provide correct functionality based on your needs.

I don’t want to deprived the files:

Download