Ever wondered how you can clone your productive environment to your development environment to work, test and develop with real data?
That’s what we want in our company. For now we made all changes in the productive environment, as the initial configuration. But after the go live, we wanted to test the changes and planned improvements for the ServiceNow experience before we implement those in our productive instance.
Note: The cloning process in ServiceNow is handled as a change request in the HI portal.
Clone process
In the following image you’ll find the clone process.
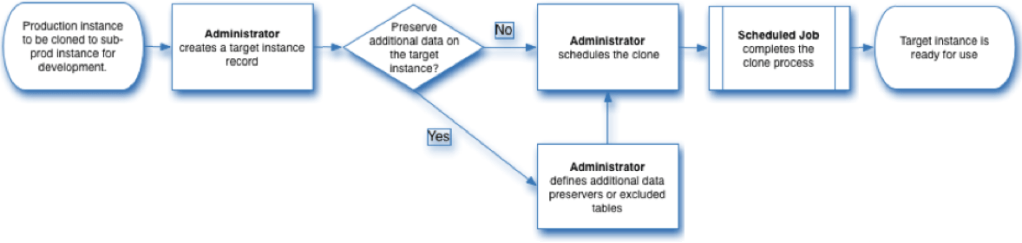
The following tasks will be performed of the ServiceNow platform:
- Generates a file to preserve operational data on the target server. This file contains the data preserved by data preservers.
- Copies the database schema from the source instance to the target instance.
- Create tables in the target instance database using the source instance table definitions.
- Copies data from the most recent nightly backup of the source instance to the target instance database.
Certainly large tables are normally excluded. These include audit, log, and email tables. - Briefly disables UI traffic and requests to the target instance server.
- Displays the message Clone in progress… to any user accessing the target instance.
- Restores operational data preserved from the target instance.
- Runs any post-clone cleanup scripts on the target instance.
- Briefly suspends all email functions on the target instance.
- Queues any event to regenerate text indexes.
- Enables UI traffic and requests to the target instance server.
What you’ll need:
Roles: Clone_admin
URL of target instance
Admin username and password of target instance
Note: The target cannot be a live production instance
Note: Ensure the target instance, whether dev, test, stage or other, has the system property glide.db.clone.allow_clone_target enabled.
After you provided all information, we will prepare the cloning process.
Source instance:
Co create a target, go to the module Administration -> Clone Targets and hit new.

Select the target instance
Now we created a target entry, we will request the clone process. Therefore navigate to System Clone -> Request Clone.
You are asked to provide the target instance. Therefore select the previous created instance.
In the next field, you can define a schedules start time for the clone process.
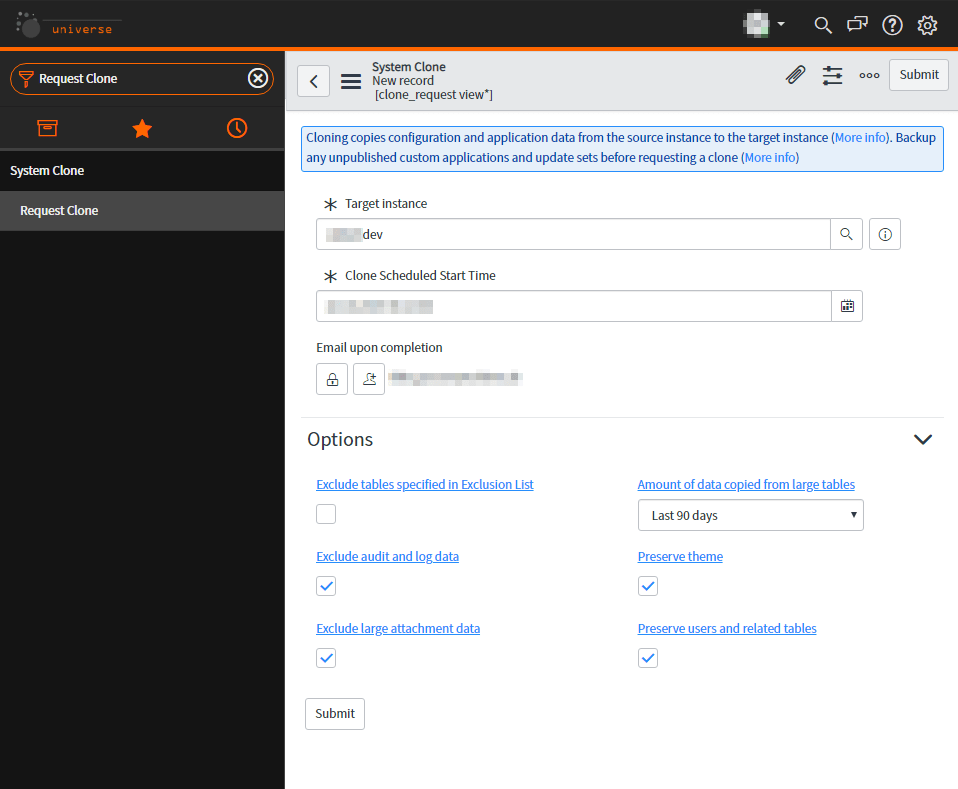
Now a form is displayed where you have to set the necessary information:
| Field | Description |
| Target instance | Select the previous created instance as target. |
| Clone Schedules Start time | Note: I’d like to recommend to clone the instance outside the business hours due to performance issues of the productive, source instance. |
| Email upon completion | Email recipient when the clone is done or failed |
Clone options
| Field | Description |
| Exclude tables specified in Exclusion List | Prevent cloning records from the source instance specified in the System Clone > Exclude Tables module. Use this option to create empty but usable tables on the target instance. By default, the system excludes tables for auditing, license usage, logging, and notifications. This option is selected by default. Note: This option is not supported by the legacy clone engine. |
| Exclude audit and log data | Prevents cloning audit and log records from the source instance. Use this option to create empty but usable audit and log tables on the target instance. This option is selected by default. |
| Exclude large attachment data | Prevents the cloning of large attachments such as video files, image files, and other typically large binary file types. Excludes all common binary file types, regardless of file size. When selected, the clone also excludes attachments from the Attachments [sys_attachment] and Attachment Documents [sys_attachment_doc] tables that meet all these criteria. The attachment table_name value does not indicate it is a small file. Small attachments have table name values that start with ZZ_. The attachment data type value indicates it is a large file such as application or video. The attachment table_name is not one of these system tables: sys_certificate, ecc_agent_jar, ecc_agent_mib, sys_store_app, or invisible.sys_store_app. |
| Amount of data copied from large tables | Select the number of days of historical data to clone from large source tables, including task, pa_scores, and metric_instance. By default, the target instance receives the latest 90 days of historical data from the source instance. |
| Preserve theme | Preserves the theme and CSS elements on the target clone. |
| Preserve users and related tables | Prevents Users and user-related tables from being overwritten on the target clone. |
| Clone frequency* | Specify how often this target automatically receives clone data. For more information about scheduling cloning, see Schedule cloning. |
| No. of occurrences* | Specify the number of automatic clonings. The maximum value is 9. |
*This is not necessary in our use-case.
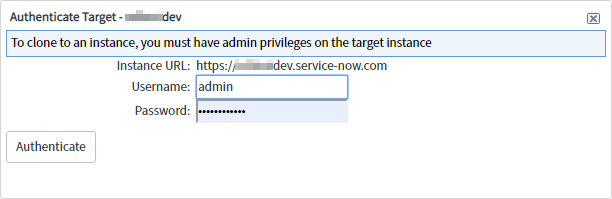
After you provided all information and hit the submit button, you are asked to authenticate with the credentials of the target instance admin.
When everything is prepared, you’ll receive change request notifications for your clone request. Those notifications are sent from the HI portal.
I’d like to show you this notifications, but there are sensitive data contained, so you’ll need to view those on your own. 😉
Cancel a clone
Required role:
Admin
In some cases you have to cancel a clone process for a reason. To cancel the clone, you simply go to the module System Clone -> Live Clones -> Active Clones. You’ll find a list with the active clones. Now open the wanted clone. The option to cancel a clone, you find on the Related Links section. Be careful, the clone process is directly canceled. You won’t receive any confirmation page.

Duration and completion
The duration of the progress depends on your amount of data and which tables you defined for the cloning.
For comparison, we have productive data from two months and not excluded any table. In our case, the cloning took about 00:45h for completion. You can see the history as well as the Clone Logs in the System Clone -> Live Clones -> Clone History module.
Rollback
After clone completion, you have up to contact ServiceNow Customer Support and request a rollback of the target instance to its pre-clone state. You are notified when the rollback is complete.
Referred Links
